OIDC Provider
Setting up the OIDC provider will allow Hyper Cloud Automation to authenticate to your AWS Account without use of AWS Access Keys. OIDC Provider will allow Hyper Cloud Automation to authenticate using JWT Tokens.
Setup OIDC Provider and Role
- Log in to your AWS Account
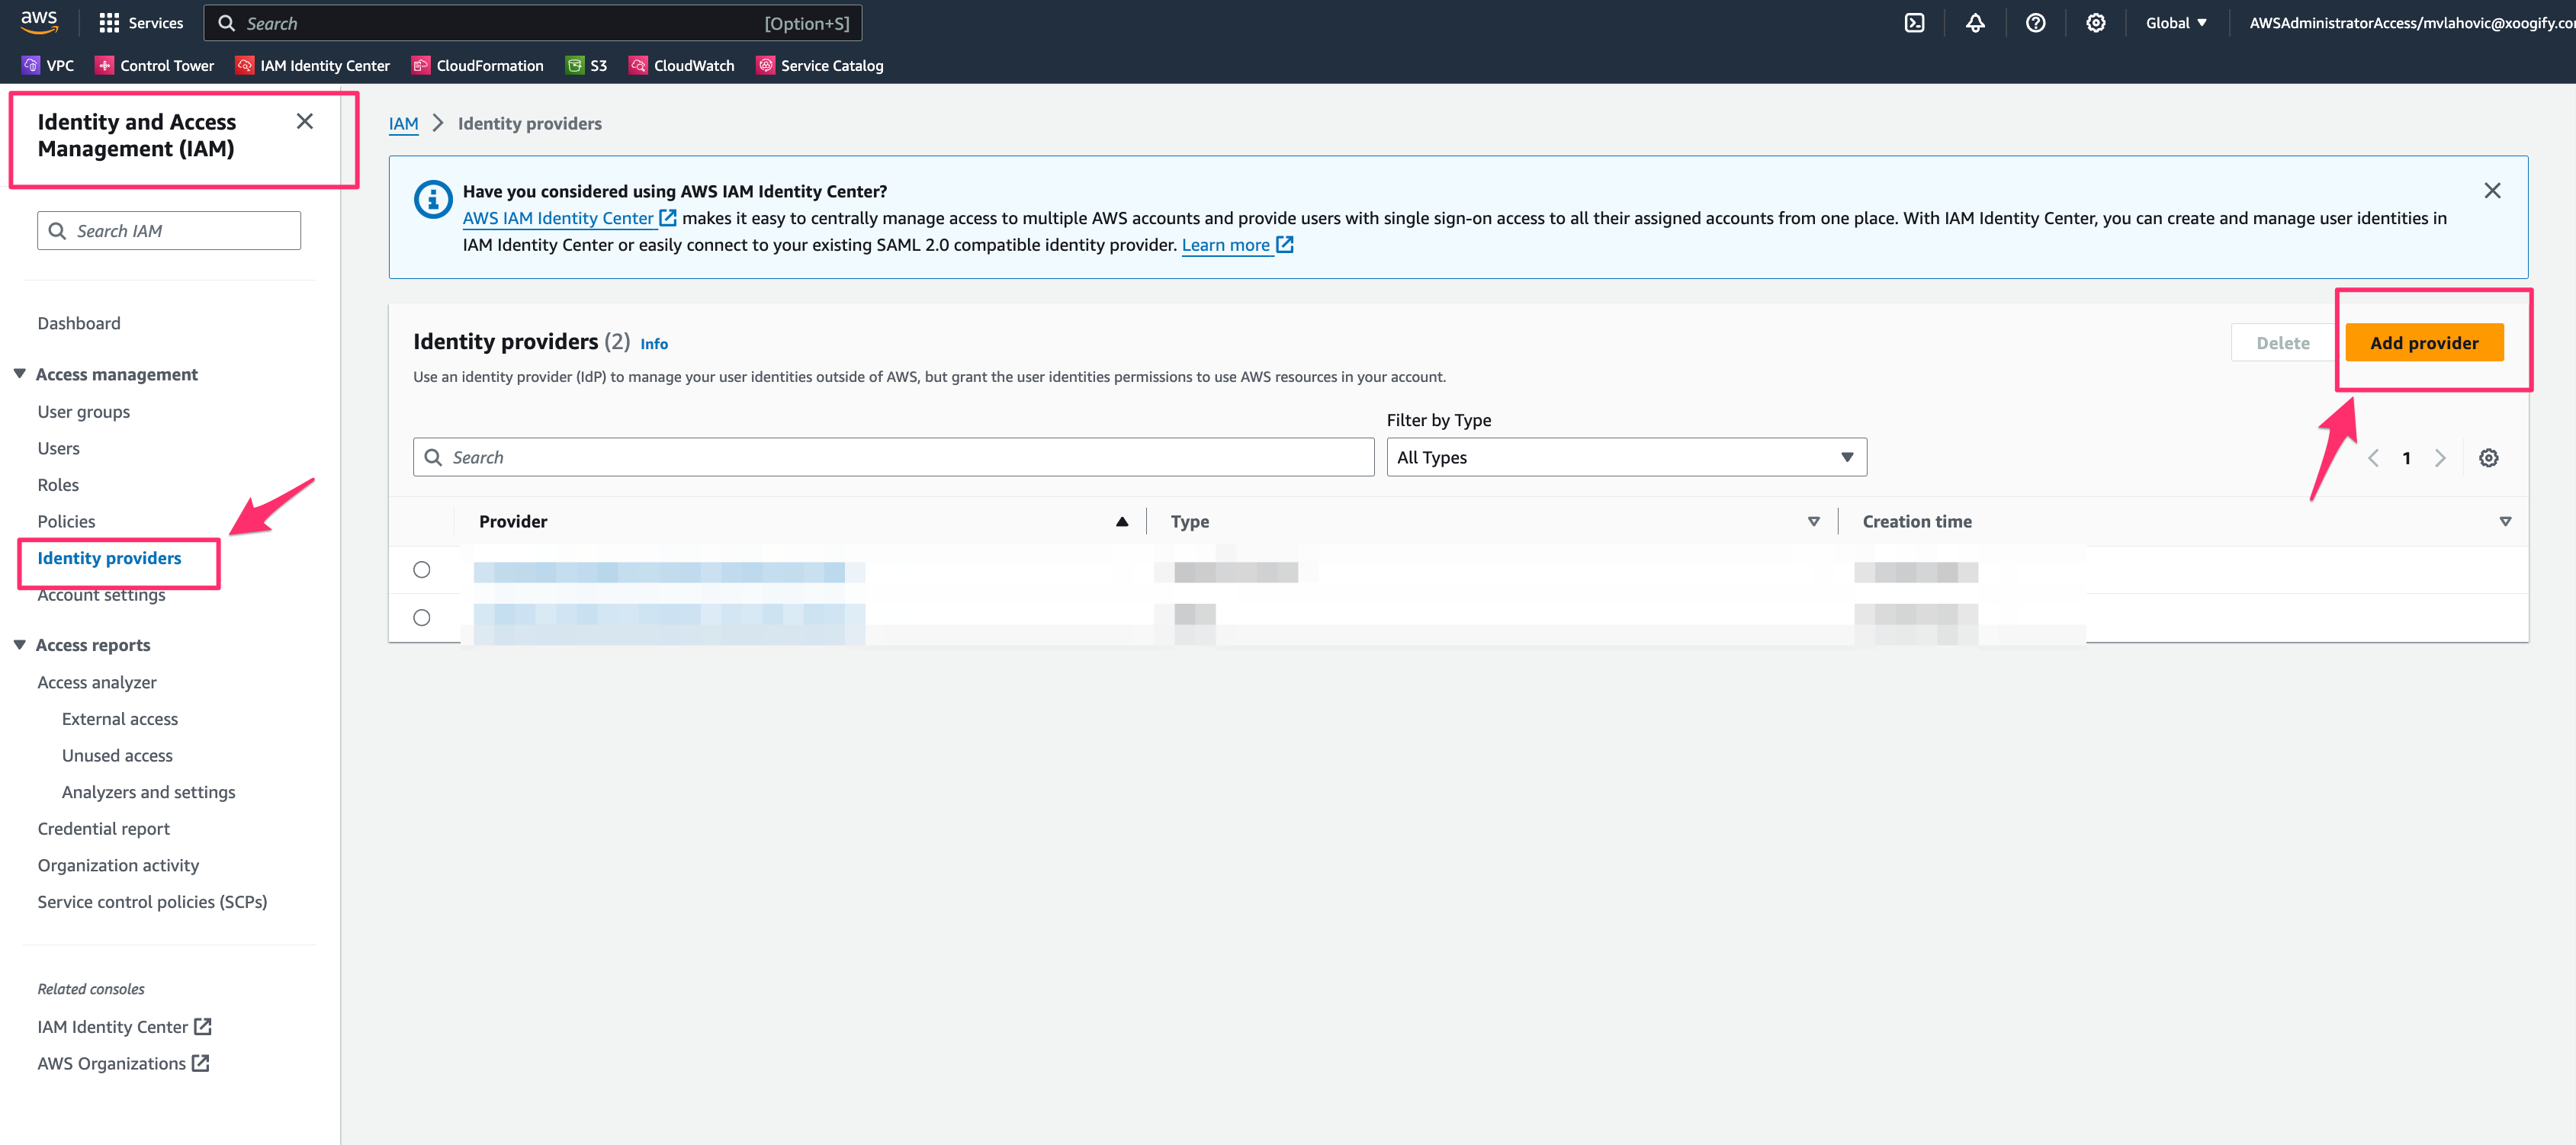
- Go to IAM
- In the left navigation menu click on Identity Providers
- On the right click Add provider button
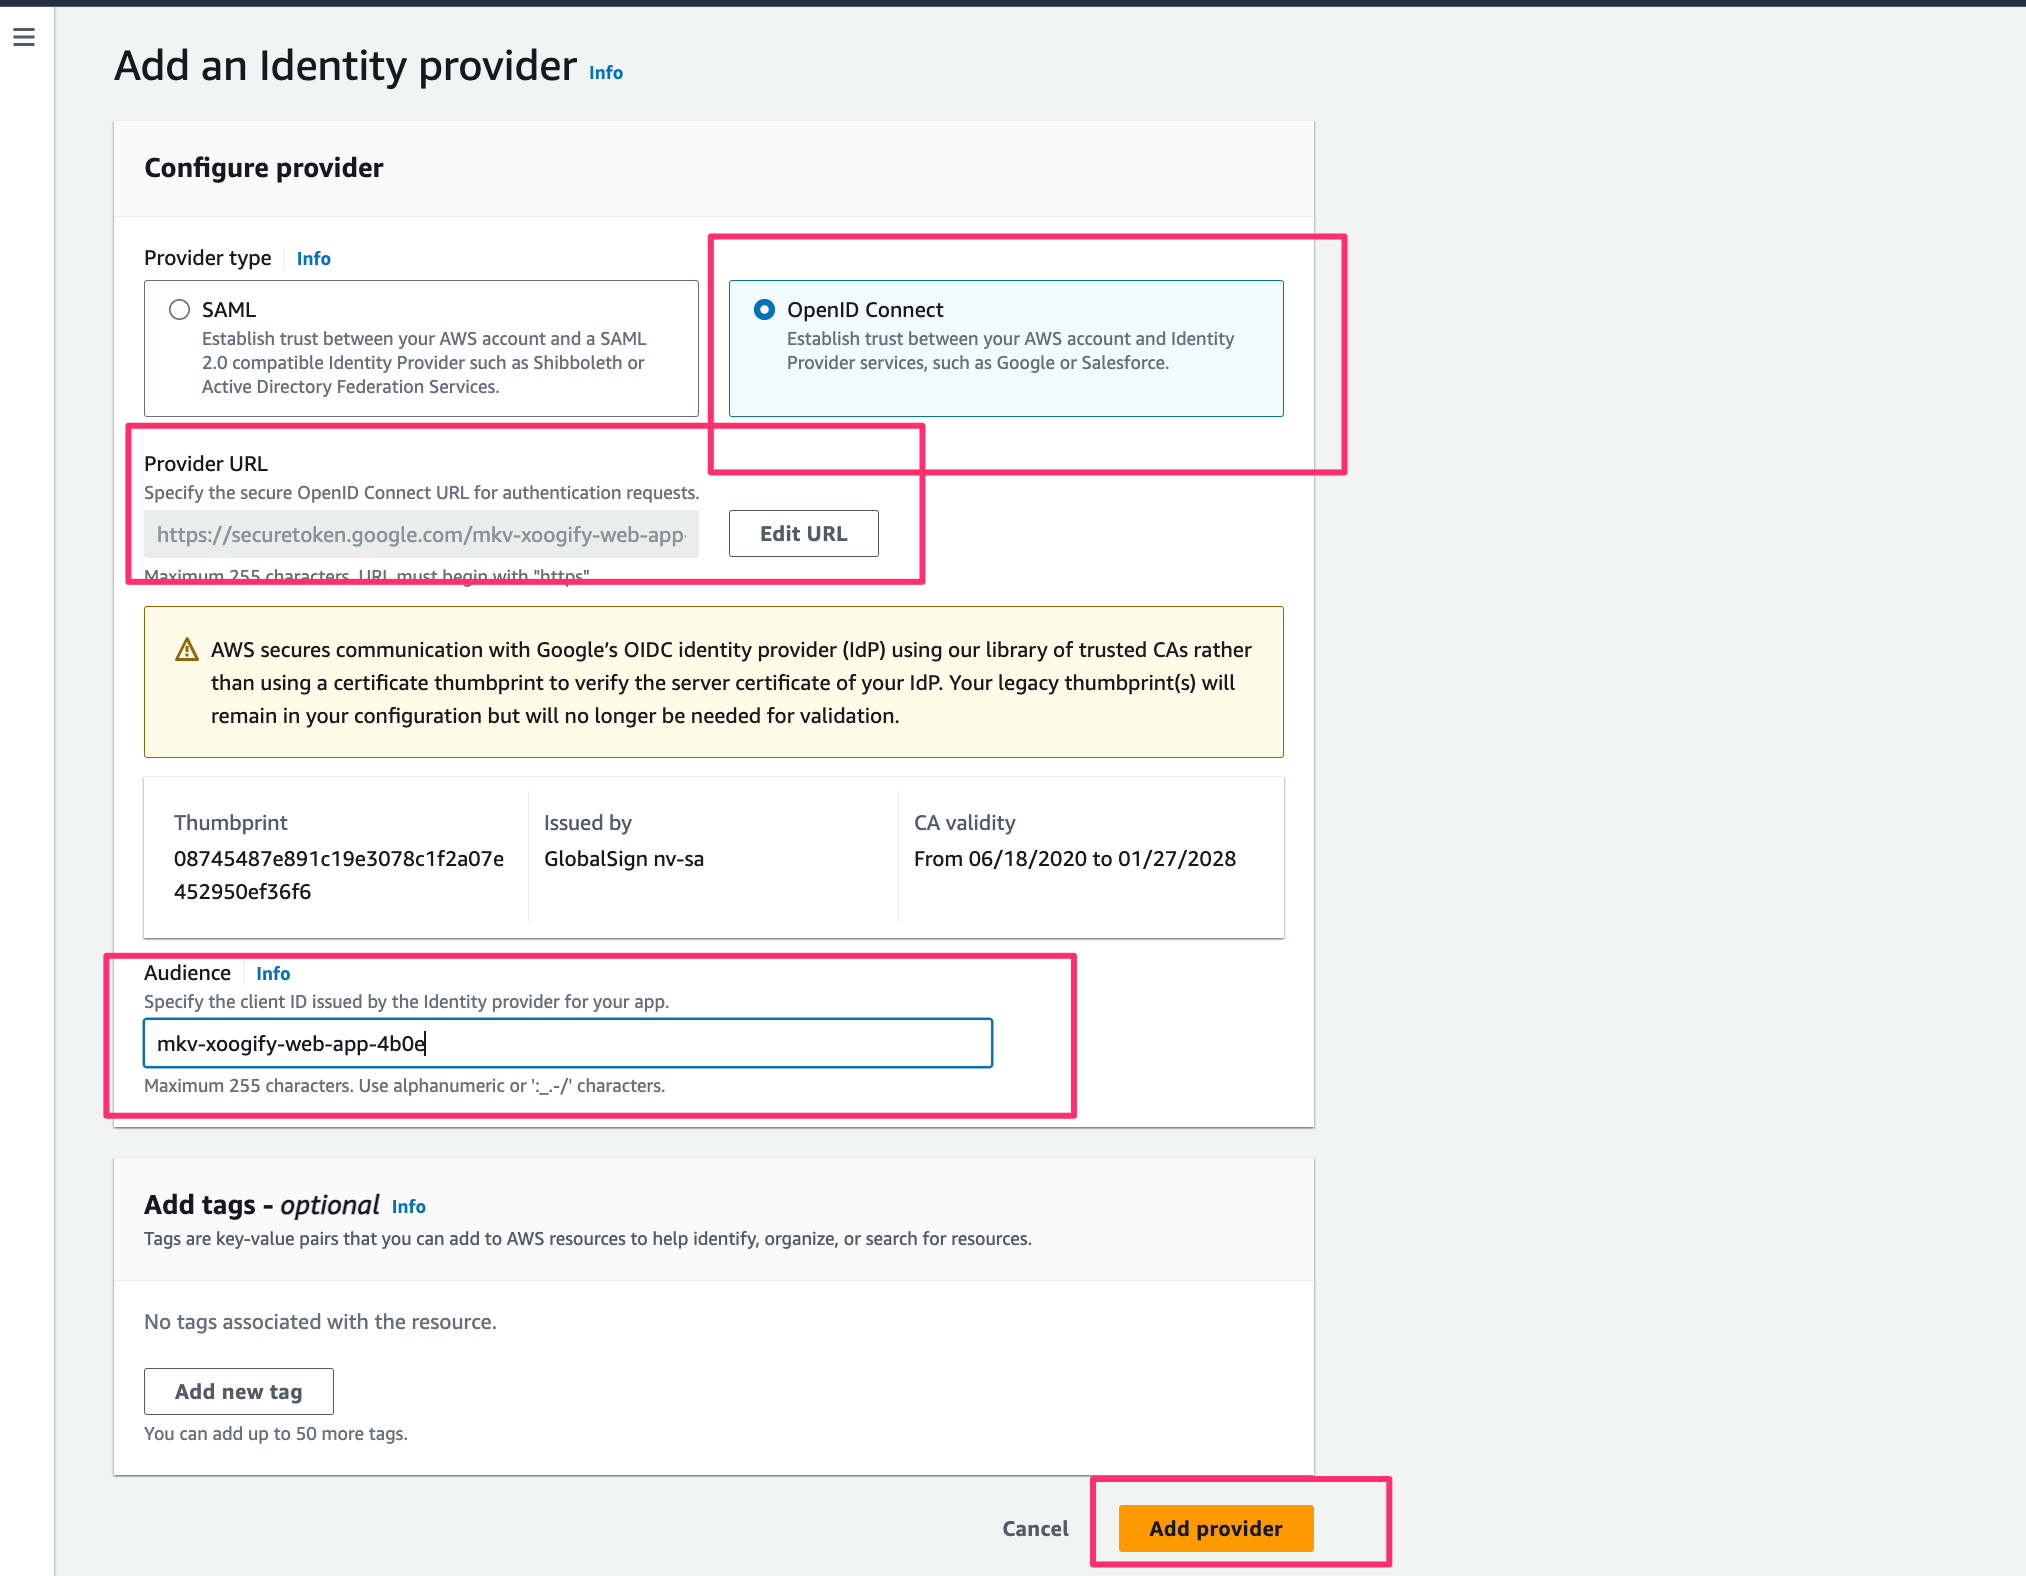
- Set the following:
- Provider type: OpenID Connect
- Provider URL: https://securetoken.google.com/mkv-xoogify-web-app-4b0e
- Audience: mkv-xoogify-web-app-4b0e
- Click on Add Provider
- You should see securetoken.google.com/mkv-xoogify-web-app-4b0e in the list of providers.
- Click on securetoken.google.com/mkv-xoogify-web-app-4b0e and note down the ARN.

- In the left navigation menu click on Roles
- In the right corner click on Create Role button
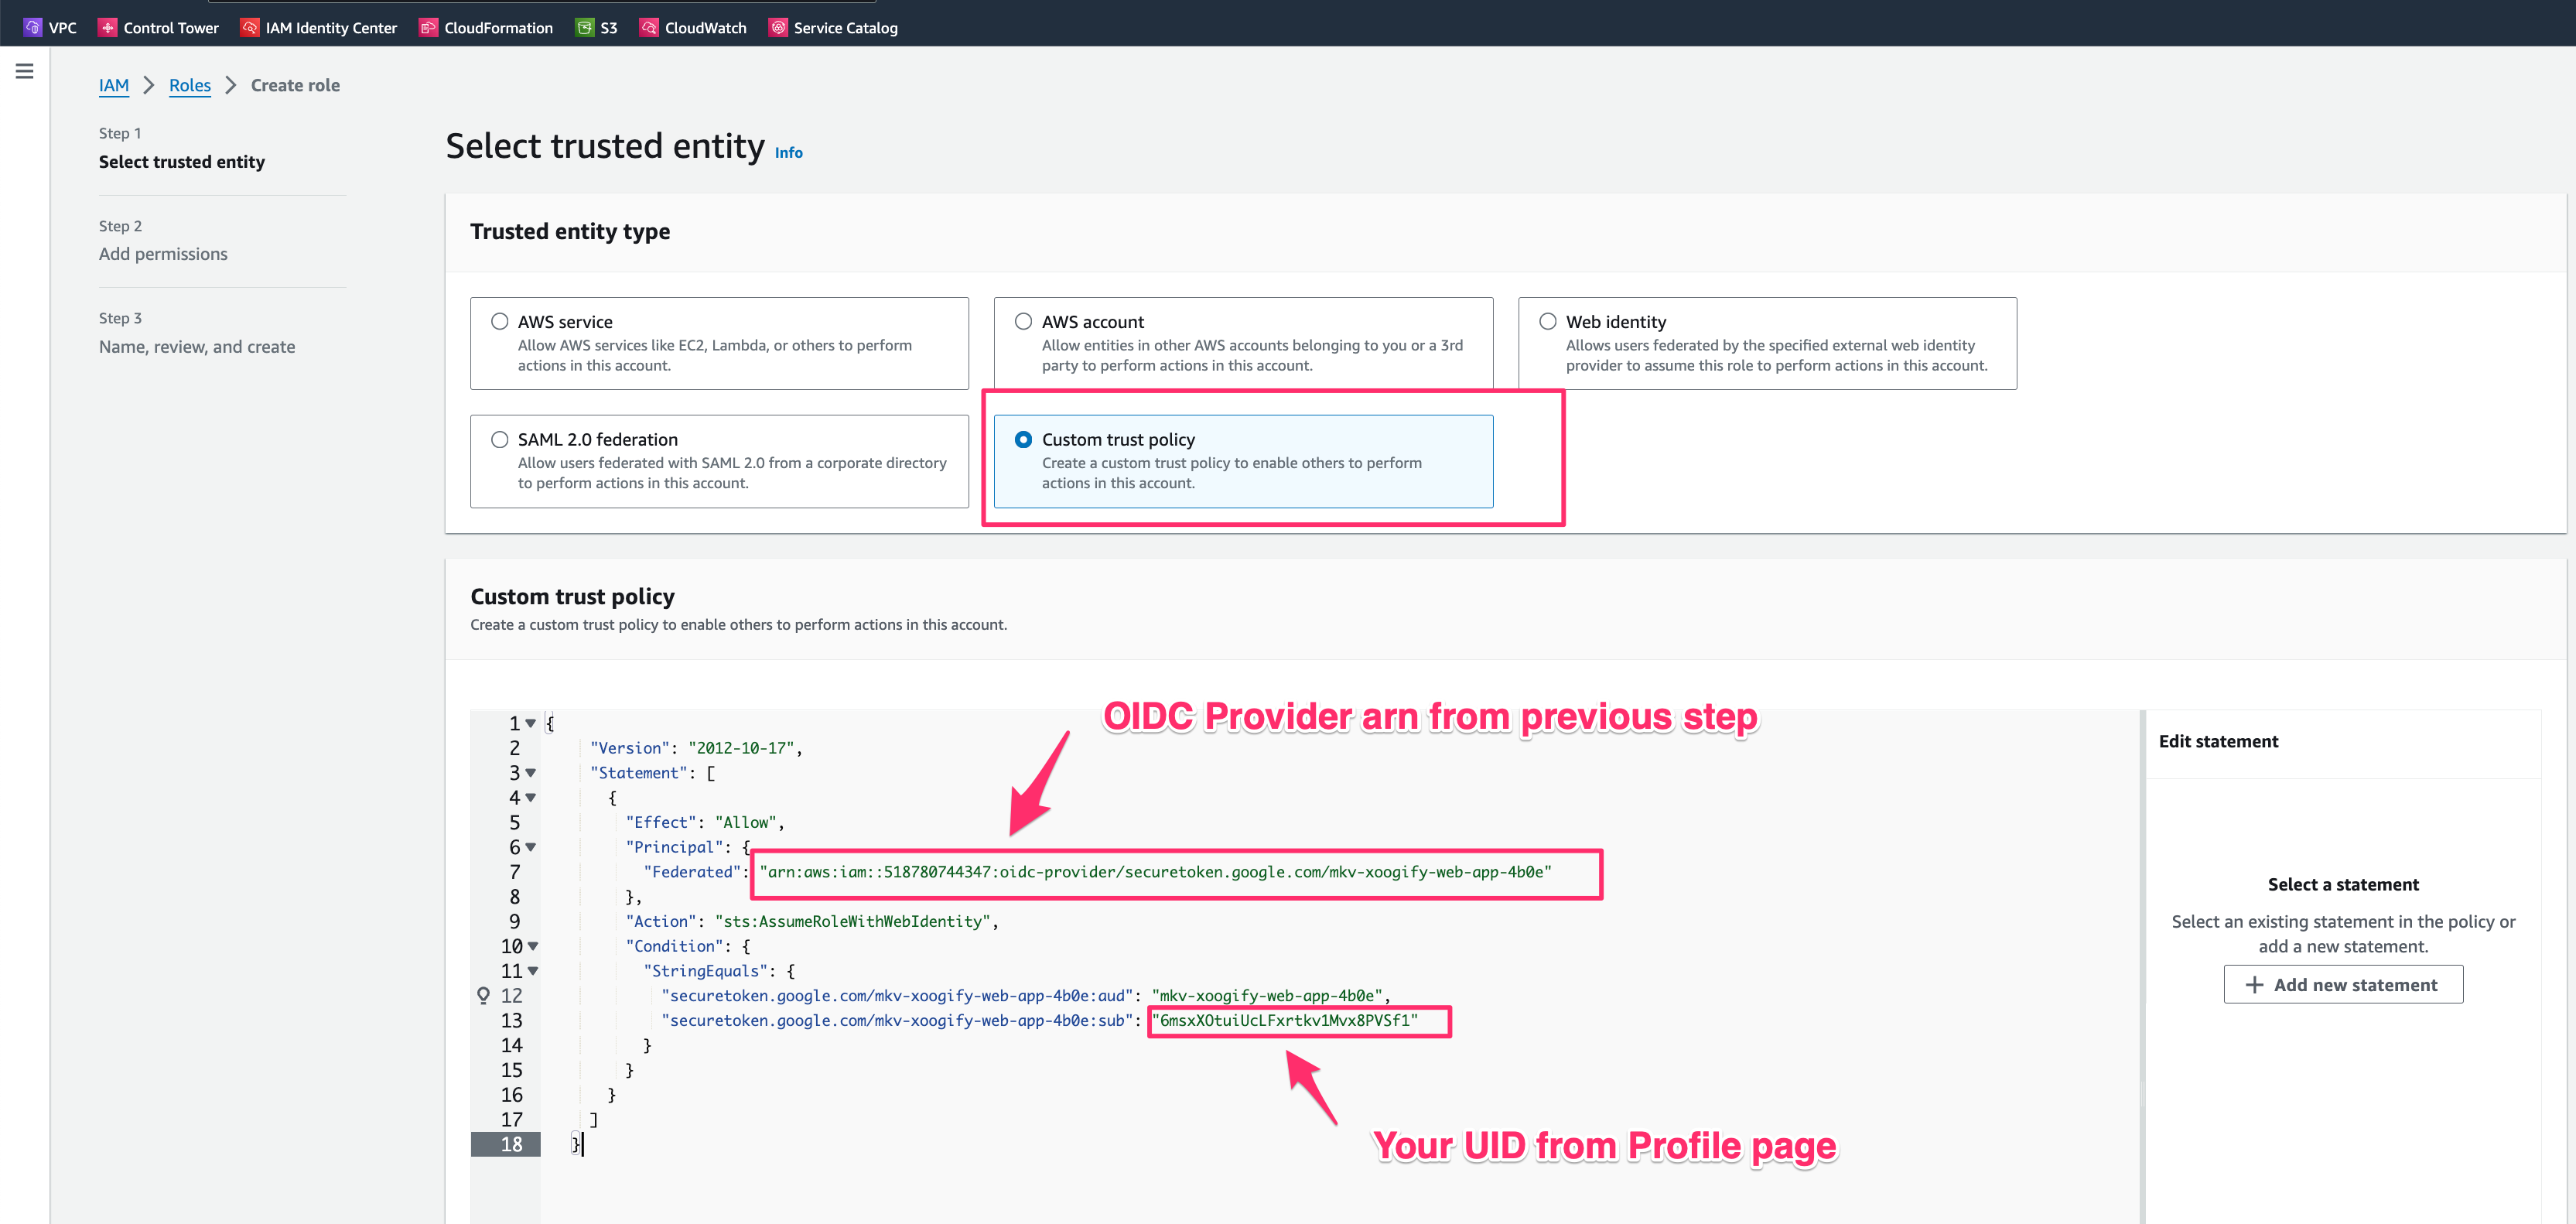
- Select Custom Trust Policy and set the policy to be like this:
where:
{
  "Version": "2012-10-17",
  "Statement": [
    {
      "Effect": "Allow",
      "Principal": {
        "Federated": "arn:aws:iam::<YOUR AWS ACCOUNT ID>:oidc-provider/securetoken.google.com/mkv-xoogify-web-app-4b0e"
      },
      "Action": "sts:AssumeRoleWithWebIdentity",
      "Condition": {
        "StringEquals": {
          "securetoken.google.com/mkv-xoogify-web-app-4b0e:aud": "mkv-xoogify-web-app-4b0e",
          "securetoken.google.com/mkv-xoogify-web-app-4b0e:sub": "<Hyper Cloud Automation UID>"
        }
      }
    }
  ]
}<YOUR AWS ACCOUNT ID>is the ID of the AWS Account where your are creatint this role (same account where OIDC Provider is created)<Hyper Cloud Automation UID>is your user UID in Hyper Cloud Automation. You can find this value in Profile page.infoYou can specify an array of UIDs as well. For example
"securetoken.google.com/mkv-xoogify-web-app-4b0e:sub": ["uid1", "uid2", "uid3"]warningIt is very important to set UID value in the above policy. Do not leave it blank
- Press Next
- Add
Administrator Accesspermission.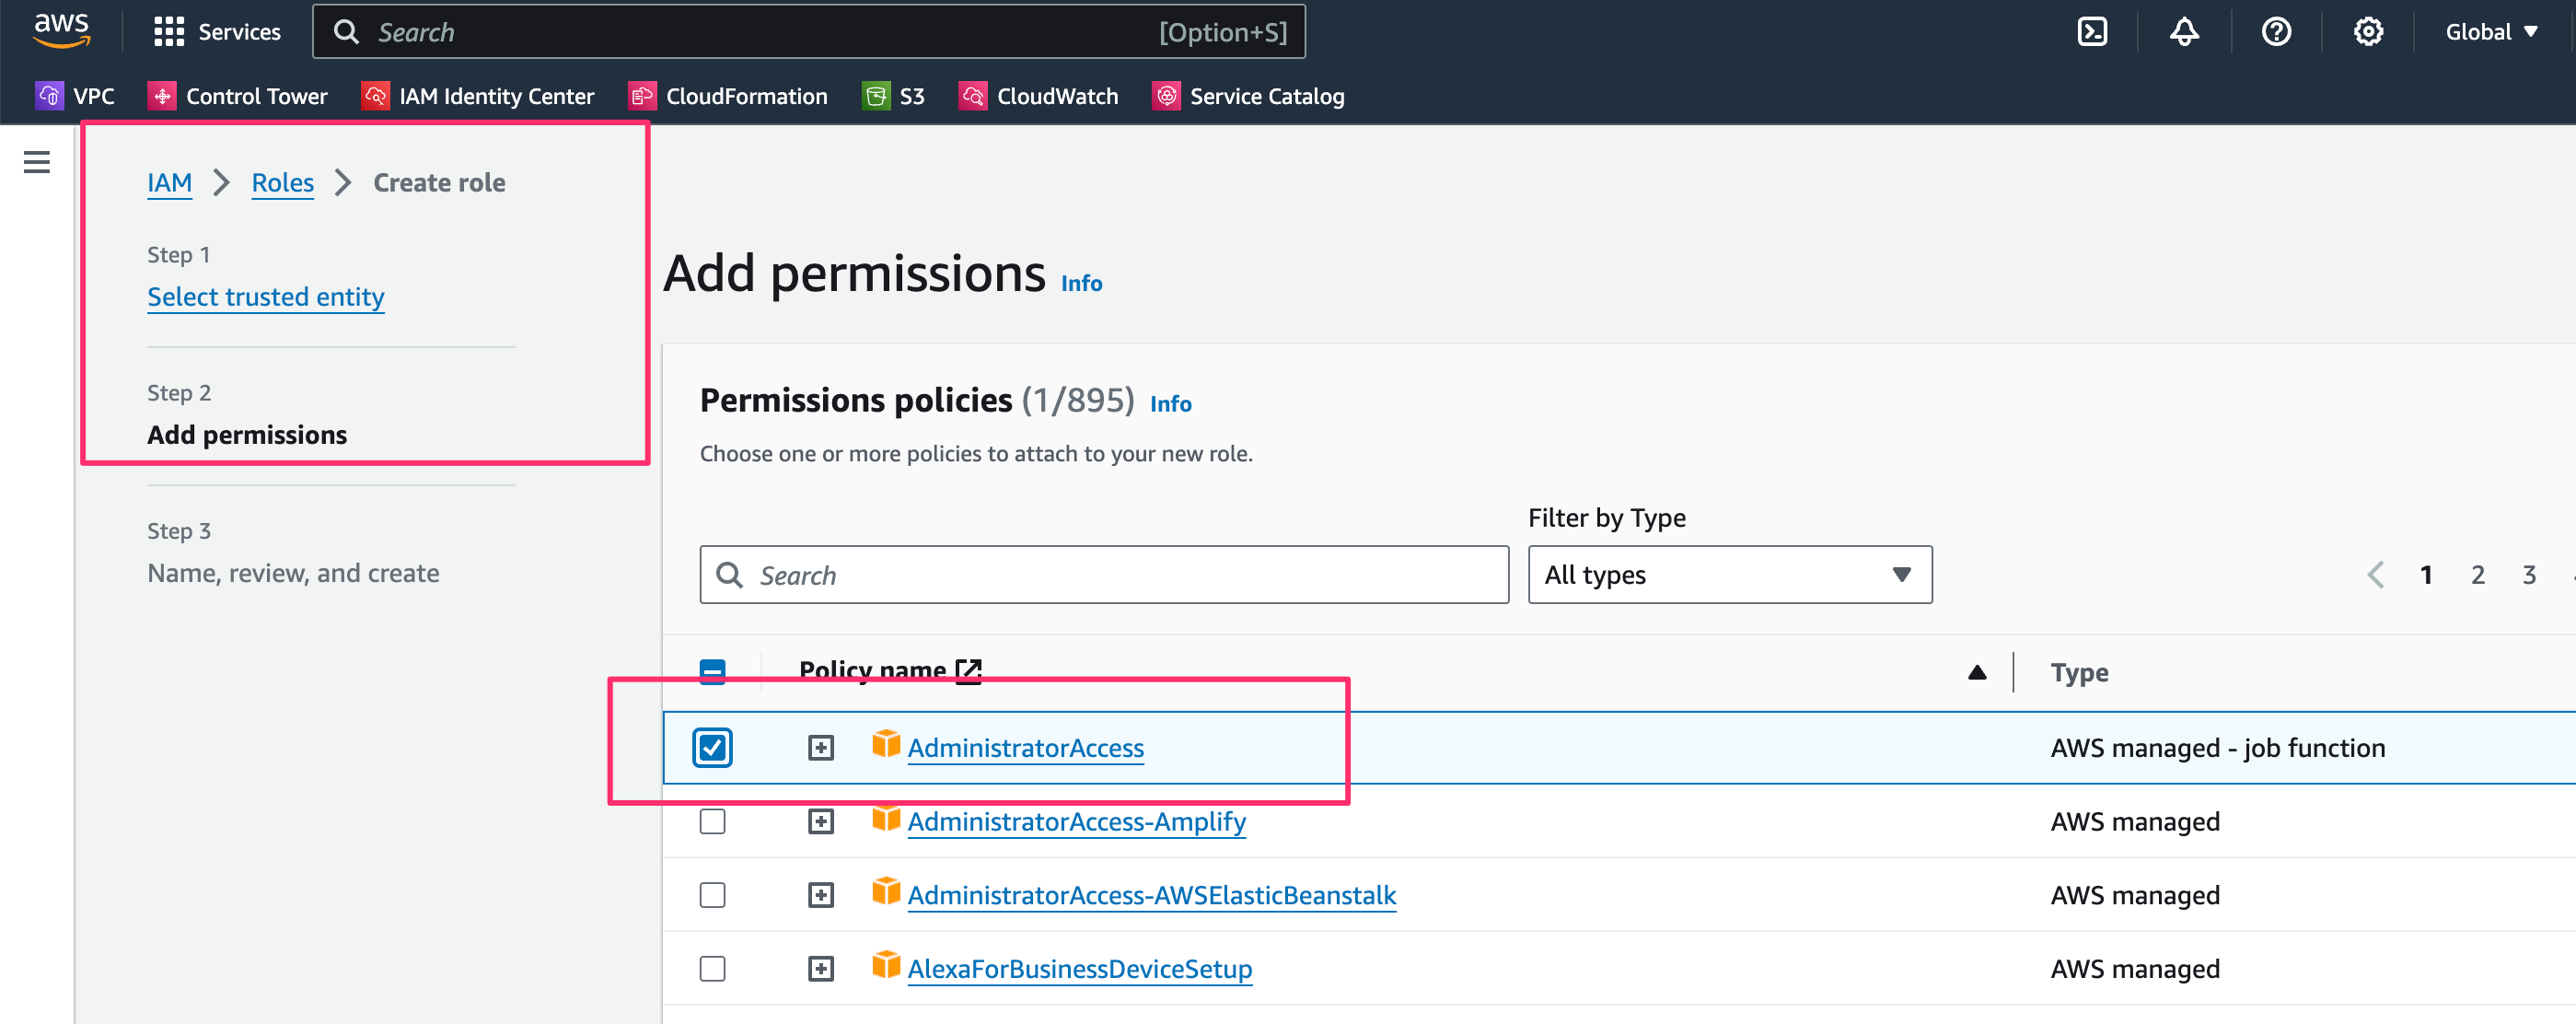 info
infoUsing
Administrator Accessis a broad policy best suted to deploy any kind of resource in your AWS account. If this is too broad you can set the permissions to other less broad roles. - Press Next button
- For role name enter xoogify-admin.
- For description enter Hyper Cloud Automation Federated Role"
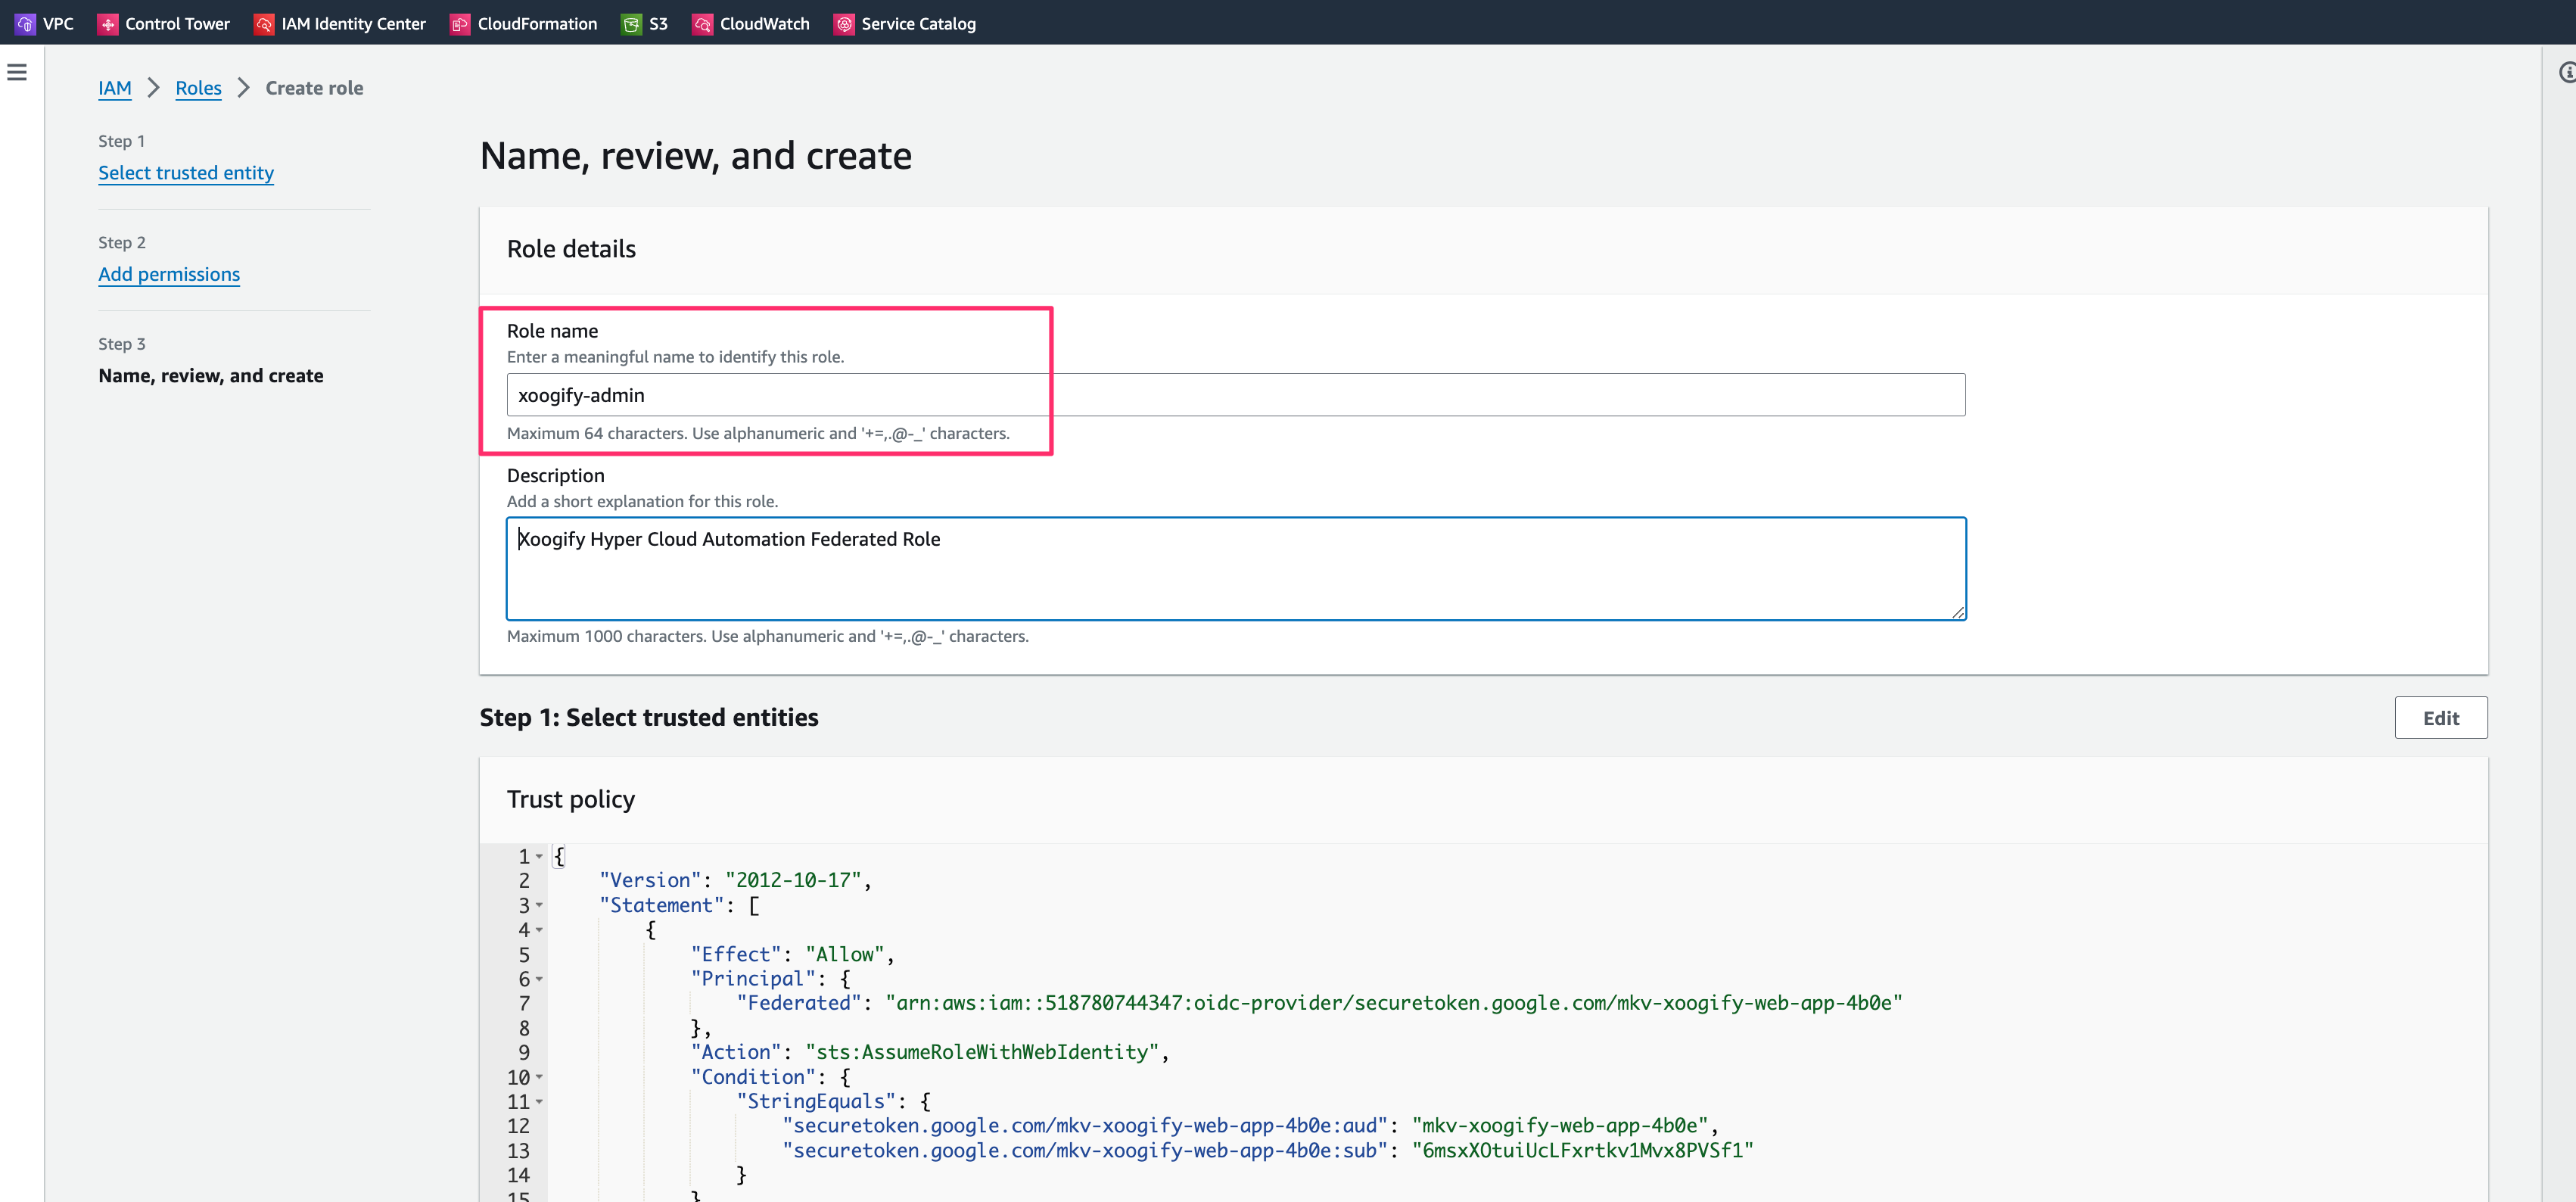
- Press Create button
- Note down the ARN of the created role. You will need it in the next section
Use OIDC Role in Hyper Cloud Automation
This is an example of how you can use the above created role
- Go to undefined
- Click on the Environments in the left navigation menu
- Click on Add Enironment button and give it a name
- Add
AWS Accountto the environment tree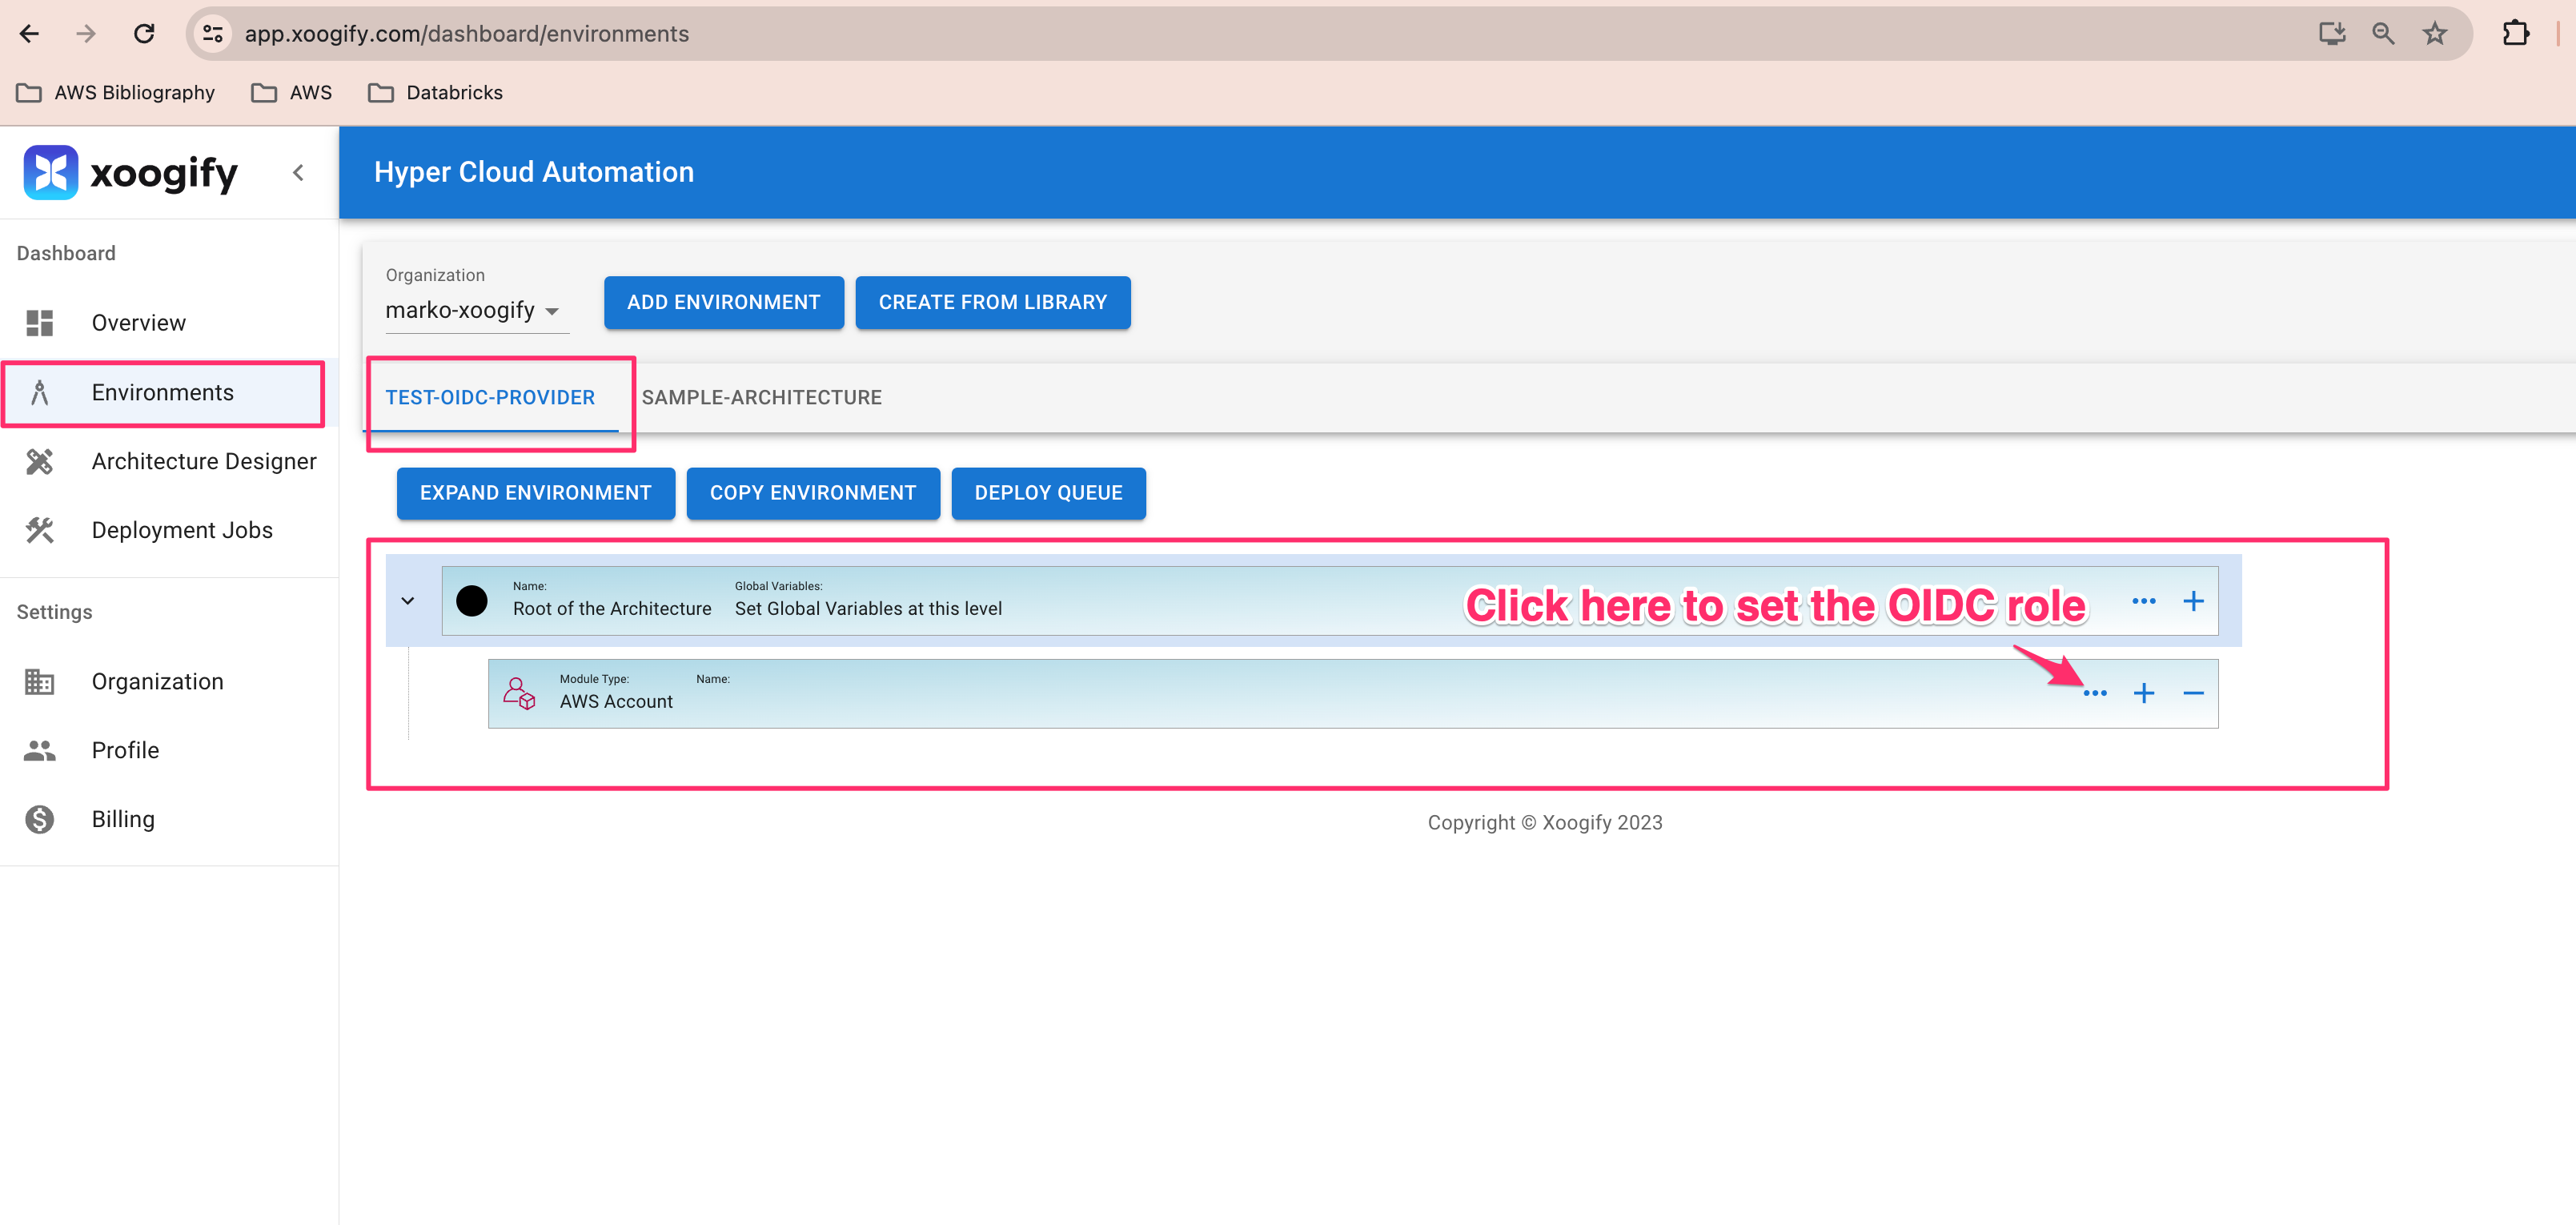
- Click on Config button of the
AWS Account(it looks like three dots) - Set the following:
- Name: Your AWS account name (can be anything but it's good to match the actual account name).
- AWS Account ID: Must be valid account ID. In this tutorial it should match the account ID where the OIDC role is created in the Setup OIDC Provider and Role section.
- Assume Role ARN: The arn of the role created in the last step of the Setup OIDC Provider and Role section.
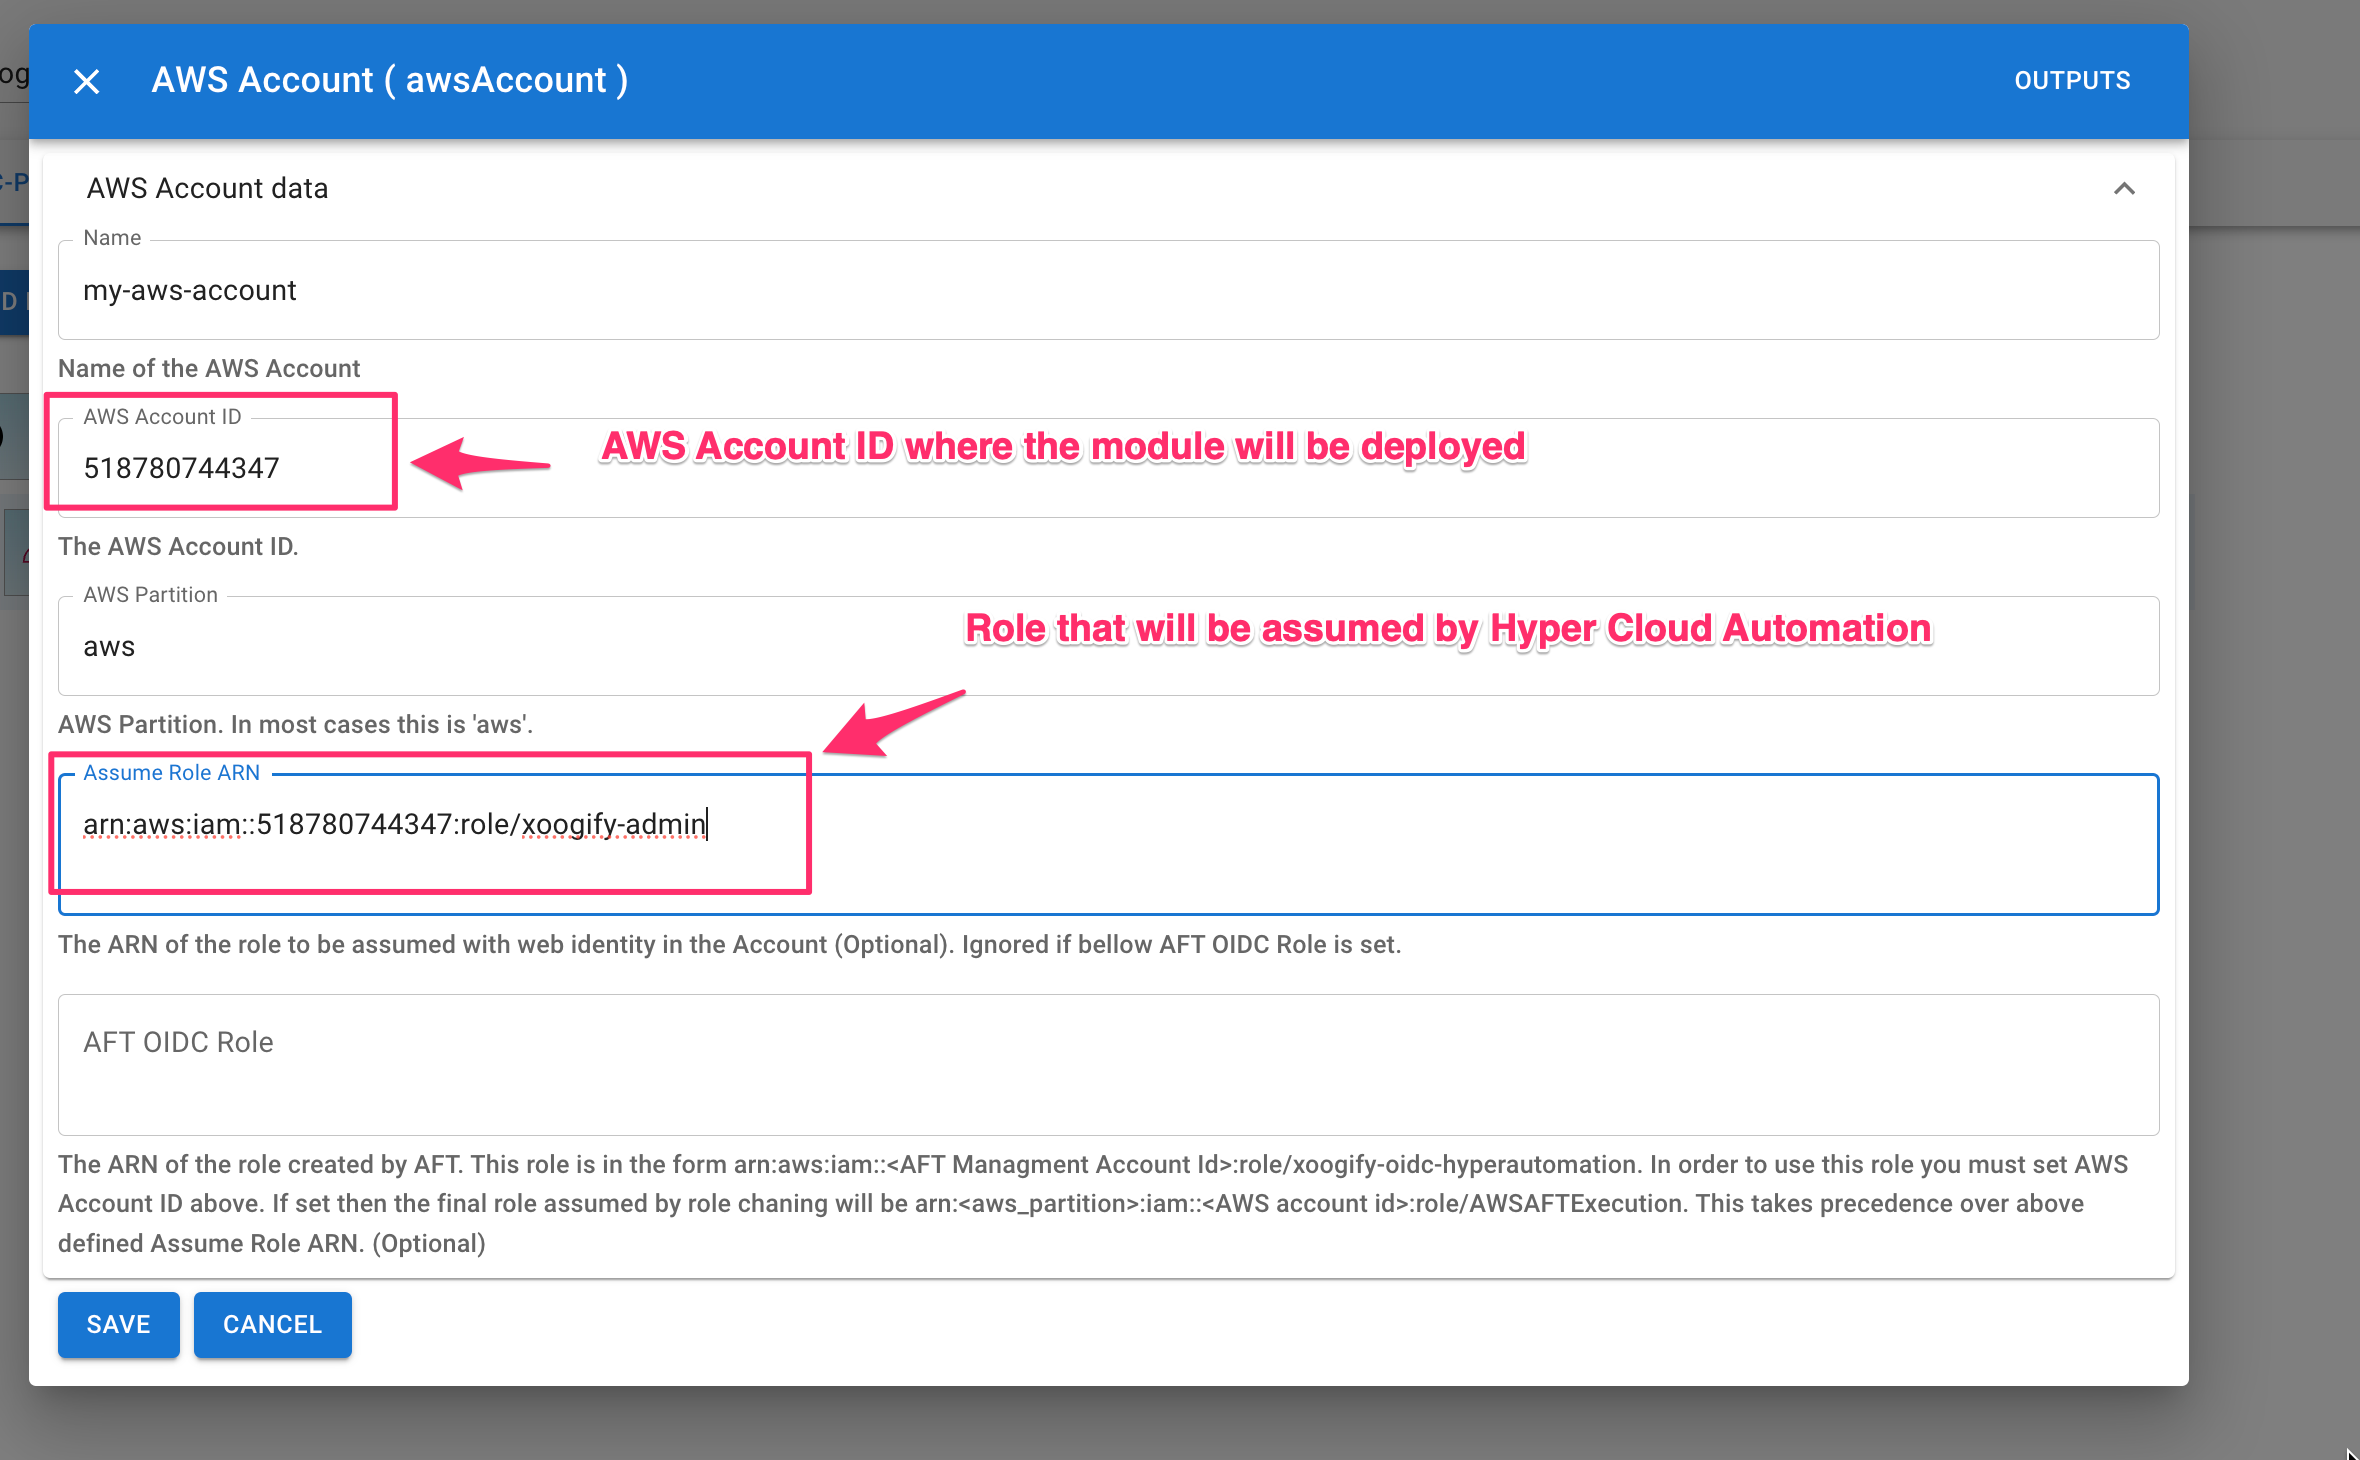
- Press Save Button
- Add
AWS Regionto theAWS Accountand set it to whatever region you want (For example: us-west-2) - Add
AWS S3 Bucketto theAWS Region - Open Module Config and set the name of the bucket.
- Scroll down and press Save
- You should have something like this:
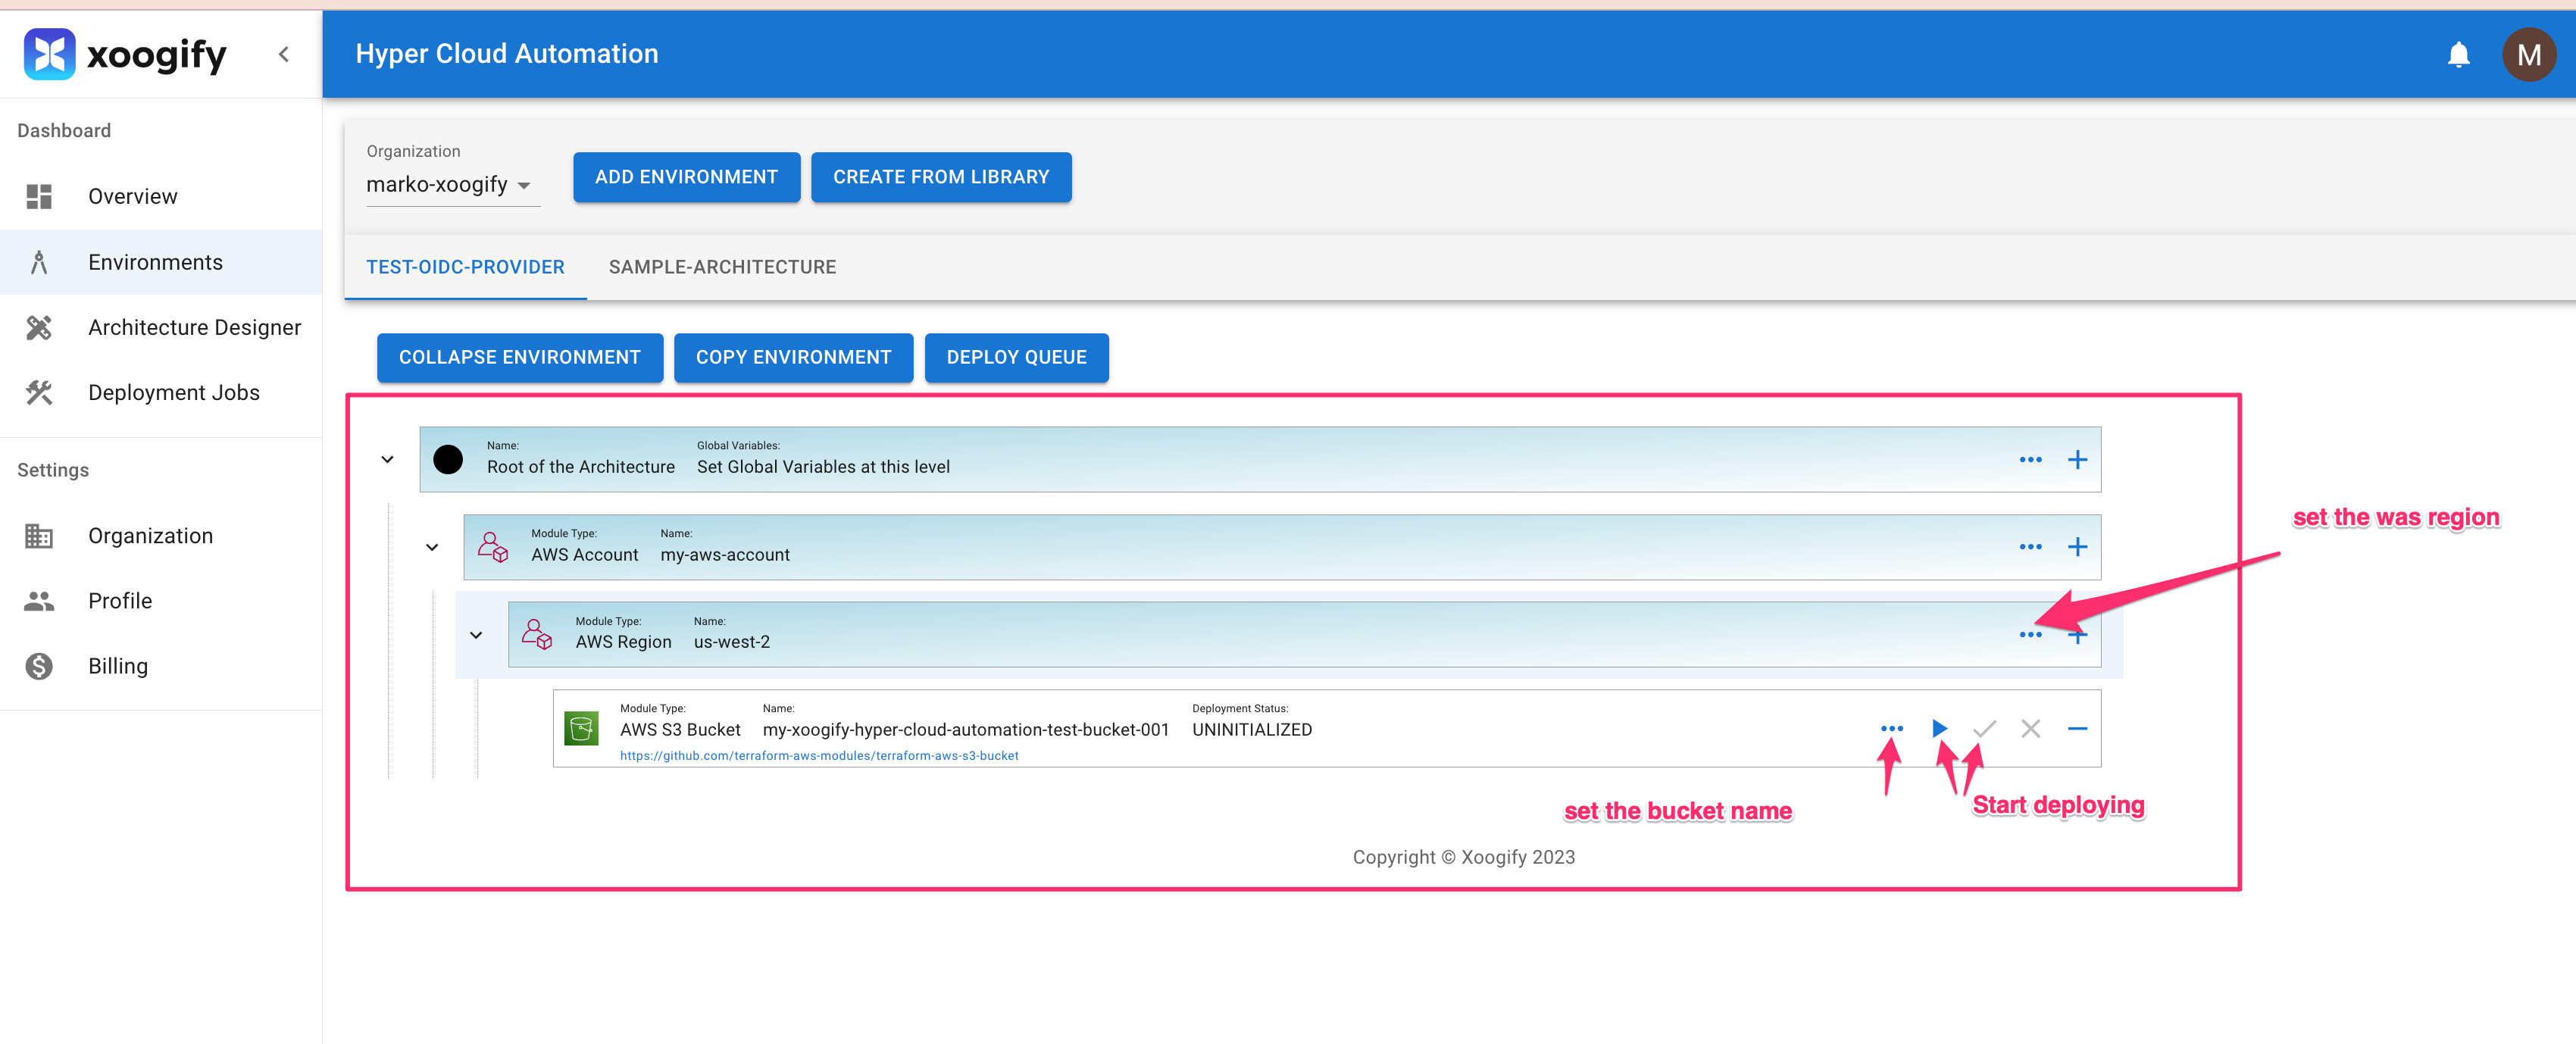
- You can start deploying the module. See Modules for more details.